TEXTURED MOSS BALL DIY

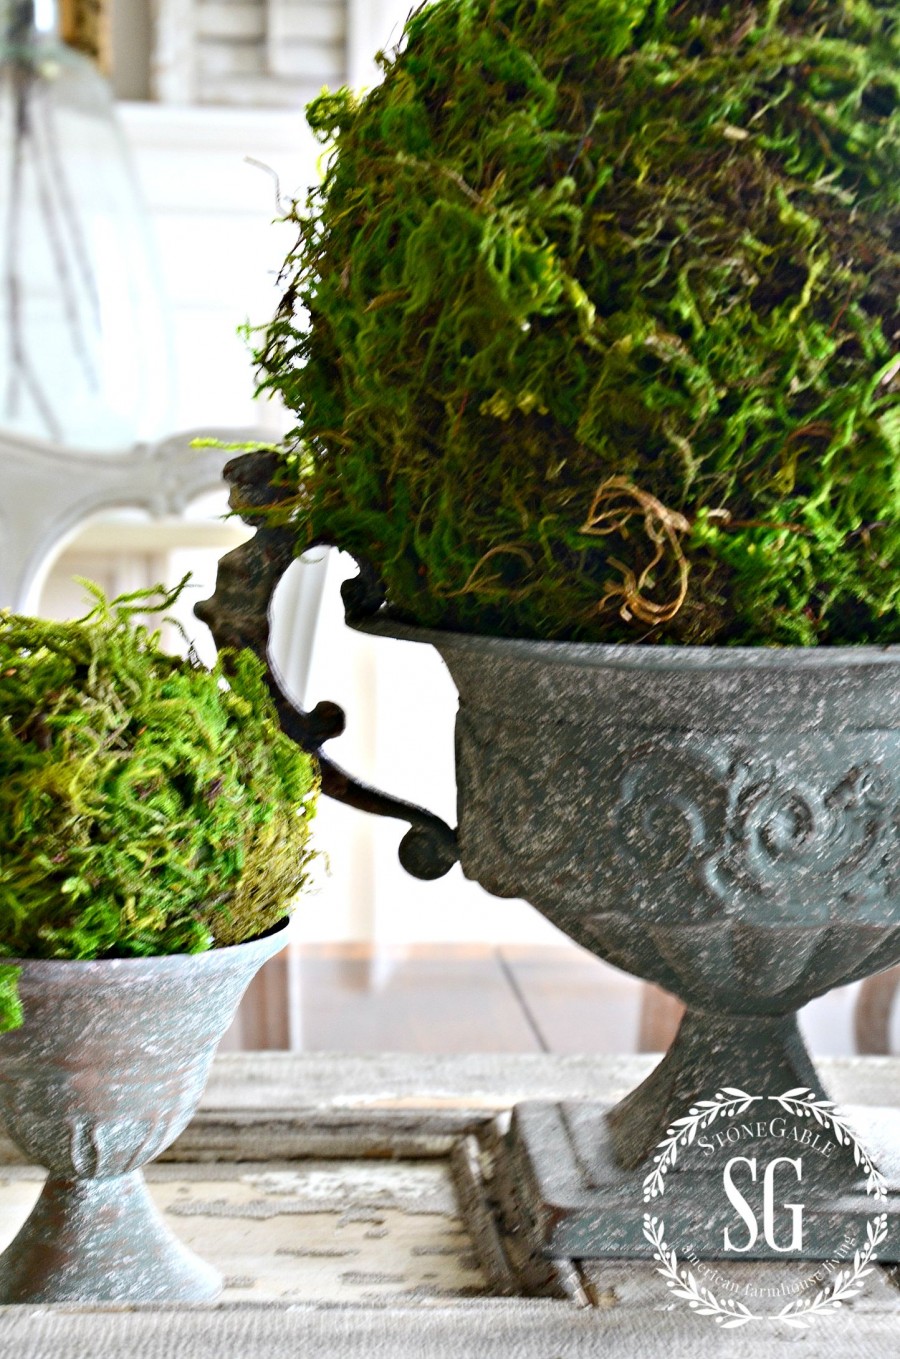
What do you do when you need just a little something extra when you are creating a vignette or an arrangement. What do you put in dough bowls or on top of cake stands or in trays or trophies like the one above? Think MOSS BALLS!!! Moss balls are a fabulous “decor filler”. They are fluffy and round and beautiful and organic and fill up space in the most textured, mossy way! They are also very very easy to make!!!! You don’t need to be crafty… anyone can do this project and they are a hundred times nicer and cheaper than store-bought.
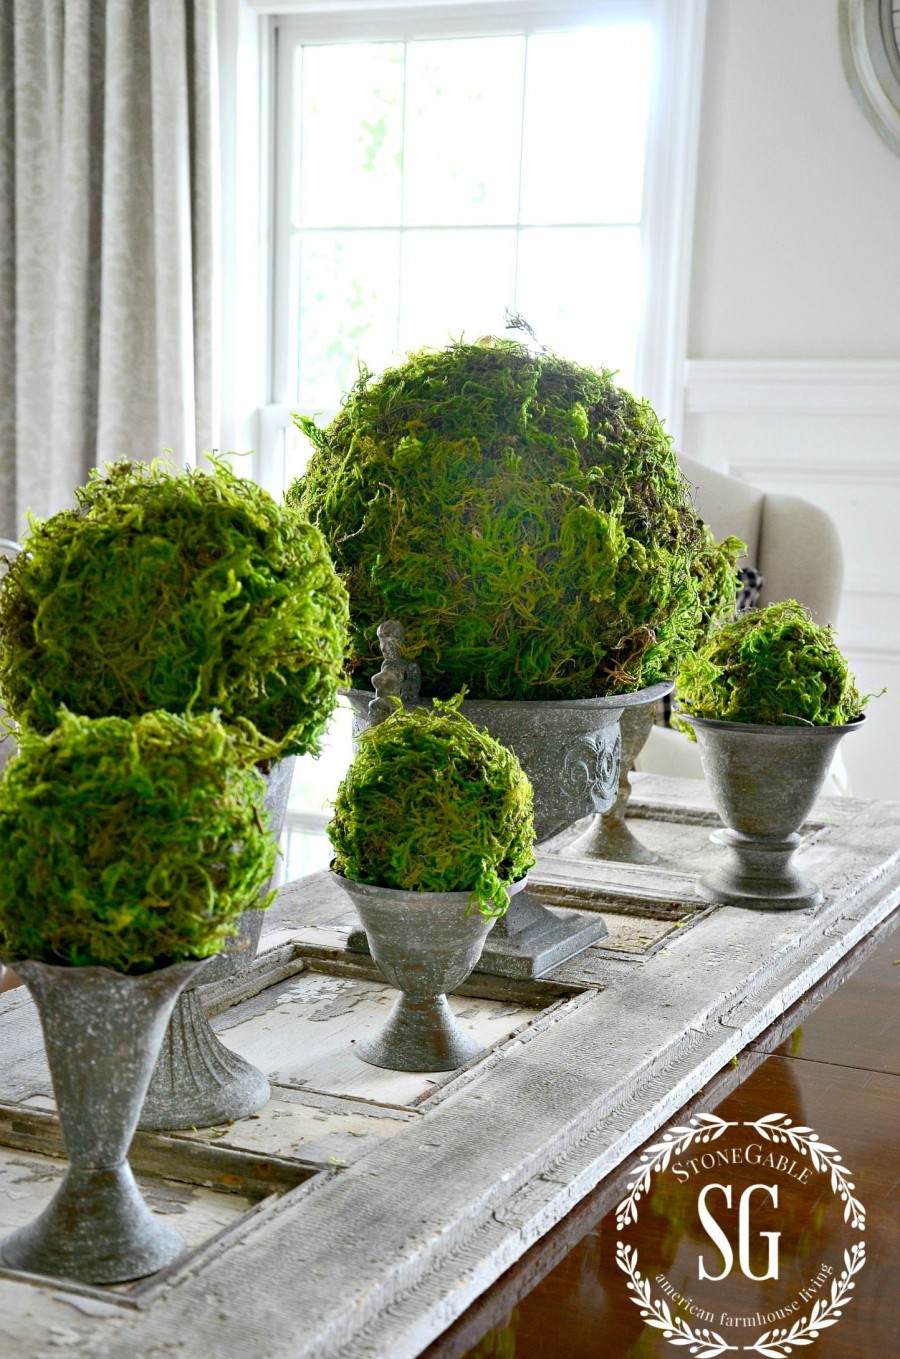
Make a bevy of them in different sizes to use in your decor. I can’t wait to use them this fall with white pumpkins in a huge wooden bowl!!! Or at Christmas among silver balls or for spring in nests. Oh, they possibilities are limitless!
Let’s get started…
 1. Materials:
- styrofoam balls in assorted sizes
- moss I got mine in a big bag at A.C. Moore and of course I used a coupon.
- spray adhesive
- spray fixative in matte finish
This project is best done in a well ventilated area if you are using a spray adhesive. You also might want to cover your area with an old drop cloth and your work area with Reynolds Wrap Non-Stick.
Disposable rubber gloves are also a great idea. I learned the hard way!
2. Spray about a quarter of a styrofoam ball with spray adhesive.
3. Press moss onto the adhesive. It will stick very well. Continue until the whole ball is completely covered. Then press the moss into a compact shape. Each ball will look different. One of a kind beauty!
To keep the moss color looking vivid spray 2-3 light coats of matte spray fixative all over the ball. Dry completely.
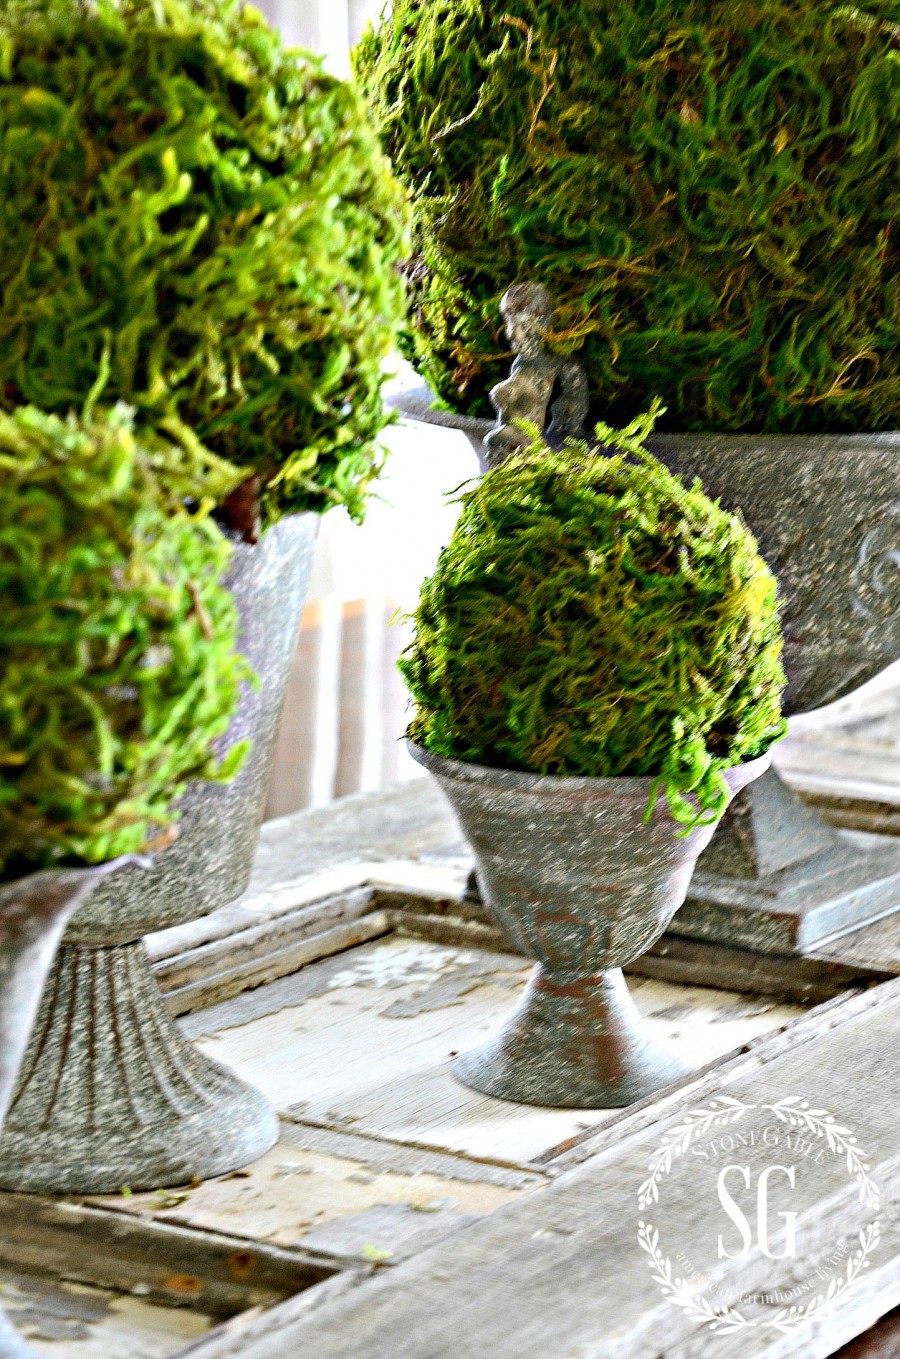
This is such an easy project and these moss balls can add a huge pop of color and organic feel to decor!!! Just think of all the wonderful ways you can use these!
Remember to pin this to your Pinterest DIY or HOME DECOR boards. You can follow me on Pinterest and see all the fun things I’m finding to pin every day HERE.

If my moss begins to turn a bit brown, I just mix some water and a little green food coloring in a small spay bottle. I spray it over the sink and let it dry. Start out with only one or two drops of food coloring as it doesn’t take much to restore the shade of green desired.. Always start out light and you can always go darker.
Great tip, Eileen! Thanks!
Thank You for everything you share. You are so very talented
Love the idea and it sounds so easy to make. Thank you for sharing!
Your right Yvonne, these would look fabulous with white pumpkins! Great idea! Thanks for sharing:)
I really love your idea!! I’ve already pinned it. I have the spray adhesive but I have no idea what the “fixative” spray is. I haven’t been crafting for quite some time so I have no clue. Is there a brand name I can go by? If I go to Hobby Lobby or Michaels do I just ask for matte fixative spray? I really need to be pointed in the right direction.
I’m jumping in here to answer. Yvonne I hope I am not offending you.
Krylon Fixative is used to protect drawings, or chalk products. My guess-and only a guess Yvonne used Fixative to protect the moss from shedding.
Kylon products can be found at Lowes, Home Depot, Walmart and some craft stores. AND no, I don’t work for Kylon, but it sounds like I do.
Great craft Yvonne. You do everything so well!
Love these mossy balls! AND especially the stone-like vessels they are sitting in. Thanks for sharing your technique. I have lots yet to learn about DIYs!
I, too, would like to know what “fixative” spray is. I love this idea and even have some old moss balls that would be wonderfully refreshed using this tutorial. Thanks for sharing this quick and easy idea.
I use Krylon fixative spray. It will keep the balls intact and keep the color green for a long time
I’m with Marisa. What’s a fixative? Can you give us the brand name? Can you use hairspray?
Sounds like a plan, thanks for the tip!
This is perfect timing. We have been getting so much rain this summer (wish we could share with CA) that moss is growing everywhere. I’ve been transferring it to my fairy garden and now I have a another fun project do.
These are lovely!! And I also love that they are inexpensive and easy to make…win-win! Off to Pin…
Thanks for the how to! I think these are just to cute.
Have a great day.
Love this! Thanks for all your ideas!!!
Definitely making these not only for me but for a friend’s much-needed color on her dining room table. These would also make beautiful and inexpensive Christmas gifts or Hostess gifts. Thanks for the instructions, Yvonne!
Thanks for the idea and how to Yvonne! They are a perfect accessory for home designs. These fit in anywhere you need that little touch of something extra. Thanks for sharing! 😉
Hi!!! Can these be used outside? We live in New Mexico and our front porch gets REALLY hot!!!!
I can’t wait to go to the store to buy the supplies. They will look good with my burlap balls that I have displayed in my hutch. Thanks for this diy.
Very pretty sweet Yvonne I invite you to share at my Thursday hop ( you can link up through Sat at midnight) xo
Love this idea, Yvonne–the beautiful green against the gray/stone of the urns and vases is just lovely. I’ve posted it on facebook–
Love these, Yvonne!
And yes, they’re so simple to make! I made several of them a last year and displayed them on small stone urns in our living room. They’re so pretty! Never thought to share them as a DIY decor . . . and so glad that you did!
I hope you’re having a great week!
Suzanne
Would you mind sharing how you made them look like stone? I have been scouring the internet for some kind of DIY explanation. Please do share!
Brandy, you can buy a spray, Like spray paint but the look of stone at your local hardware store or possibly Wal-Mart’s. I used it for diff.projects .They have a few different colors as well.
Thanks, Sue!
Thank you so much for sharing this Yvonne! I recently purchased several moss balls because I love the look, but I ended up returning them because they were a bright green color and did not work in my home. I wanted something more natural looking and yours are perfect! Now I can’t wait to make my own!
Where do you find the urns? They’re fabulous! I want to make this project this weekend!!!! Thanks Yvonne!
Hi Laurie, the urns came from Decor Steals. It was one of their daily deals.
Thanks so much!
Ah ha! Just the thing I need. Moss balls. Thanks so much for this idea. Sheila
This is the tutorial I’ve been waiting for…I just didn’t know it! Thanks for sharing, especially the fiixative tip.
Love this – so easy. I’ve made one, but never thought of using fixative spray!
xo,
Seng, Lifestyle Blogger and Photographer
sengerson.com
I love moss balls and didn’t think about making them, so thanks for the how to. I don’t have moss growing in my yard and haven’t noticed it anywhere around where I live, so where do you find it, if it is not growing in your area.
You can probably get a big bag of it at your local craft store!
I just made these…to keep my hands clean, I pierced balls with chopsticks! Holes are easily hidden by moss. I love your blog.
Wonderful tip Beth. Thanks!!!
Thank you so much for the instructions for these beautiful moss balls!!! If you make a lot of them like I did, you can use bamboo skewers and stick them in a flat piece of styrofoam to spray and dry the fixative. For Christmas you can put some cranberries and orange rind on them for a nice smell. Love everything you do, so classy! Gloria
I realize this is an older post, but I just now read & pinned your gorgeous moss balls. I also gather moss and use it to “top dress” my shade planters. Just keep in the shade and of course water often to duplicate similar growing conditions. I noticed also that you ordered the wonderful urns from Decor Steals. I was glad to see this , for I can now assume this is a reliable source since I just recently signed up to receive their daily emails. I also signed up today to receive your emails, and I look forward to them.
Oh, Yvonne, this is just brilliant!
This idea is perfect for uplifting my mantle. Will have to be on the look out for some urns. I have purchased from Décor steals before and will be checking them out,
This is my next project ….can’t wait. they are so pretty. Reading this blog, looking at all of your decorating ideas I am so excited about decorating ….I see these moss balls in Home Goods. I am also making a set for my daughter for her house, I love how your directions are so easy to read and follow.
Great DIY. Thanks for the inspiration and directions!
These are gorgeous, as are all of your DIY projects. ? I can’t wait to attempt these myself. I’m a huge fan of the destrssed bowls, trophies etc. They make a great pairing with the green moss. Where can we find similar containers?
Great idea. I’ll make some today!
My project for this afternoon. Thanks!!!!!
Great idea to make the moss balls. I never thought of using the fixative spray. Thanks for sharing.
Since the weather will be nice my project for the week. Love them!!!!
I made these and they turned out amazing! Thanks for the idea and instructions. Great for decorating no matter what the season.
I love the moss balls, I have wanted them in different sizes for quite a long time but they cost so much everywhere I’ve seen them. Now thanks to you I can have all I want just for the cost of the supplies, and if I go to Michael’s and use a coupon it won’t cost so much. I really didn’t realize how easy it was to make them. Thank you so very much.
Just stumbled across this economical and perfect spring/summer idea for my dough bowl. Thank you once again for sharing your creativity.
I love the way these moss ball look and it looks so easy…can’t wait to try!
Did you use green painting on te moss balls?
Hi Dylano, the moss came that green.
Omgosh, I love this idea!!! Where can I find pots like you have pictured?
I found them on Decor Steals
These look lovely I haven’t seen them before (UK) so maybe a stupid question, is that real moss?
It is but it’s dried. I think it is Spanish Moss that has been dyed green.
What did you do in order to have all of your containers look alike with the same finish? Did you paint them or soak them in vinegar for the patina? Thanks.
Hi Cynthia, I bought them.
Wow! Thank you once again for a great project. Made the burlap table runner and love it. Also just bought some books to paint. Love your blog!!!
Yvonne, You are a most generous woman! Thank you so much for sharing this and all your other decorating ideas and tutorials!!
Bless your heart, Kathi! I do it for YOU and it is my pleasure!
These are gorgeous! I never thought about making my own! Thanks! God bless!
Hi Yvonne,
These look amazing! Can you tell us how many bags of moss it took to cover all the balls in the picture?
Many thanks
Heather
Hi Heather, I used two big bags of moss. As you can probably see from the pictures they are quite full.
Brilliant! I’ve been looking to buy them but they all look incredibly fake or they are really expensive. Got my list for my next craft store trip!
You will love these. They are so versatile
Yvonnits hard to post for the ads keep blocking what I write. I thank you for all the work you’ve done on this blog. I’m redoing my home after 20 years and as a retired interior designer I know you have great talent and are bringing me up to date. Thank you so much.
Thank you very much for sharing! I’m going to make some!
They are so so pretty!