Christmas Dough Bowl: 7 Easy Tips For Creating A Holiday Centerpiece
Craft a simple Christmas dough bowl centerpiece using beautiful natural elements like greens, pinecones, and pheasant feathers. These can be real or faux. Here are step-by-step directions to help you create a beautiful woodland centerpiece for your Christmas home.

Centerpieces are the backbone of our Christmas decor. The tree is the focal point, and the Christmas collectibles and other decor are accents, but it’s the centerpieces, arrangements, and vignettes that do the heavy lifting. And create beauty and mini focal points in the rooms in our homes.
Affiliate links included. See our Discloser Policy. As an Amazon Associate, I earn from qualifying purchases.
Welcome to our Christmas Centerpiece Tour.

This wonderful tour! 10 very talented bloggers will share festive ideas for creating beautiful holiday centerpieces and show you how to make them. In these posts, you will have step-by-step instructions for making the prettiest and most festive arrangements!
If you are coming from Thistlekey Lane, Welcome! Isn’t Michelle’s soup tureen centerpiece wonderfully festive! And the flowers are amazing!
And welcome, all! We are so glad you are here today!
I pulled out my well-worn beloved dough bowl and made a simple spin on an Advent Wreath that features natural elements, although the greens are faux. If you love a woodland look, this Christmas centerpiece might be something you would like to make.

Why You Will Love Christmas Arrangements
What Qualifies As A Centerpiece

A centerpiece is a decorative piece designed to be placed on a table or flat surface. It is intended to get attention. This is the Oxford Dictionary’s definition.
However, I think a centerpiece can be an arrangement of items tied together by something they have in common to tell a story or evoke a feeling, like a vignette.
Let’s use this definition a bit liberally. If you can put decor on a flat surface and it is a grouping that works together, then it is a centerpiece.
A basket of pinecones can be a centerpiece. Faux succulents grouped together in small pots on a console table can be a centerpiece. And so is an antique European dough bowl filled with moss balls on a kitchen table.
Find Inspiration
Most of the time, an idea for creating an arrangement does not pop into our heads out of thin air. We usually see something that starts our creative wheels turning. I love the feeling of, ooh, I think I’d like to make that. Or the more scary version… ooh, I think I can make that, how hard can it be, which usually means I’ve bitten off way more than I can chew. But I still love that creative process.
There is plenty of Christmas centerpiece inspiration on blogs like mine, on Pinterest, Instagram, and Facebook, and in magazines. Creating any centerpiece starts with that inspiring idea that gets the creative process going.
But today and tomorrow, we have done the searching for you! As well as figuring out how to do each step to be successful when you make each Christmas centerpiece.
Why I Chose A Dough Bowl Arrangement
There were two main reasons I chose to create a holiday centerpiece in a dough bowl. First, I missed creating a fall dough ball arrangement. Dough bowls are beloved vessels and perfect for large arrangements.
The second reason, I was thinking about creating a spin on an advent wreath. Over a decade ago, I created a simple advent wreath, Here and thought it was time to style another one. I knew a dough bowl would be long enough to put four candles in a row and big enough to add lots of pretty greens.
What Is Advent is a post with the history and meaning of Advent that you might enjoy.
If you have a dough bowl in any shape and size, dig it out and create a one-of-a-kind Christmas centerpiece.
Do I Have To Use A Dough Bowl
The easy answer is no! While it’s tough to beat the wood or an antique dough bowl (or a new one), here are some other things to create the look of this arrangement…
- a large shallow pedestal bowl
- large platter
- low-sided box or crate
- large bread bowl
- any large low-sided container
If you use something round to create this look, you may want to use one big candle in the middle with a glass hurricane.
Here’s What You Will Need
This centerpiece idea is so easy to make. I used what I had from my stash of Christmas greens. You can use what you have, too. Here’s what you might need…
- a large vintage dough bowl
- dry floral foam blocks
- mustard colored candle
- Stick Um
- Christmas greens
- moss
- assorted pinecones
- fairy lights battery operated and with timers
- accent seasonal decor, optional
- pheasant feathers, more feathers, optional
- dried oranges, optional
- hot glue gun
- ruler, this is my favorite
- sharp knife, if needed
- Shark handheld vacuum, (LOVE!), optional
How To Create A Christmas Dough Bowl Centerpiece
The most important part of this centerpiece is the base. If you start with a good base, the rest is quite easy to put together.
Floral Foam
To create a sturdy base for this centerpiece, I hot-glued four floral foam blocks together. And then stuck them to the bottom of the dough bowl with Stick-Um. I keep Stick-Um in my decorating toolbox and use it all the time.

You may need to cut the dry floral foam to fit your dough bowl or container. Use a sharp knife. The dry foam cuts easily. I kept my handheld vacuum near me to quickly clean up any crumbs etc.
Once the blocks were in place and did not move, I started creating the centerpiece.
Adding Candles
Using a ruler, I measured the center of a block and twisted a candle in the center of it. Once the first candle was in place, it was easy to eyeball where the other three candles went. To help them stick the candles in the block, I added Stick-Um to the bottom and a little on the sides of the candle. This helped to stabilize them.

I liked the look of the candles being slightly different sizes, so I used candles I burned before.
Add Test Greens
Creating a firm foundation lays the groundwork (pun intended) for creating a beautiful centerpiece. Now, the fun begins as we add Christmas greenery and embellishments!
Here is one box of bits and pieces of greens.


Best Centerpiece Tip
Small bits and pieces of greenery are invaluable for decorating at Christmas. Buy beautiful faux garland and large sprays of different greens on sale and cut them apart so you have lots of small pieces of greenery to choose from. And keep them together in plastic boxes.
For this dough bowl, I kept the greenery simple and used a short-needle faux evergreen. I started by adding longer stems of greens around the outside of the bowl. I added just a couple to test for length and placement so I had a pattern to follow.

Once I liked how these looked, I added…
Fairy Lights
This year’s Christmas theme for our home is Woodland Walk. My holiday decor is very transitional and could work for Thanksgiving and Christmas. You can see How To Choose A Christmas Color Palette to see my color palette for Christmas 2023.
I was inspired to use fairy lights in this centerpiece by how the stars at night peek out, twinkling brightly, between the birch and evergreen branches when Bobby and I are camping in the woods. It’s so magical! A woodland theme had to have stars! So, the fairy light became my stars.
I used the copper wire fairy lights I had on hand. But if I styled this centerpiece again, I would use green copper wire ones. The shiny copper wire shows and drives me a bit crazy!

I changed the batteries and then added the fairy light around the inside of the dough bowl with the battery box in the back, as shown.

This made it easier to position the lights as I was adding the greens.
Adding Greens To The Base
I added more greens around the base of the centerpiece, sticking them into the dry foam to secure them.

It also helped that I got the wooden turntable from the kitchen to put under the dough bowl. I could easily turn the heavy dough bowl around as I worked.
I tried to keep the base layer of greens that touched the dough bowl to lie flat-ish. I wanted the greens to look like they were spilling over the dough bowl. This is such a simple idea but one that really makes this centerpiece look lush and full.

As I added greens, I put the fairy lights on top of this base layer. The trick is to weave the fairy light into each layer of greens you stick in the dry foam.
And More Greens
The next step was to add greens to fill in the center dough bowl. The perfect greens for this step were smaller than the ones I used for the outside base of the table centerpiece.
The best place to start filling the dough bowl was to work from the outside, near to the base greens, in towards each candle. This worked best for me. It’s important to lay the greens down at a flat-ish angle sticking them into the foam. Occasionally, I would have to press the greens down with my hand.
Many of my small greens had pinecones attached to them. This was a bonus.

Don’t worry if there are spaces in the greens. You can go back and fill the spaces in later. The object is to add the greens as closely together in a pleasing fashion.
As I added the greens, I worked in the fairy lights too.
Moss And Pinecones
When I liked the way the greens looked, I added pine cones and moss to fill in the gaps and create a balanced look.

Here are a few things to remember when adding pinecones to your Christmas centerpiece…
- use only the best-looking pinecones
- group different pinecones together
- use pinecones in different sizes
- turn a pinecone or two upside down so their pretty bottoms show

- add tiny pinecones near the candles
- add a group of pinecones in a corner of the dough bowl
More Embellishments
Once the pinecones were added the dough bowl was done.
However, I had a few more additions I wanted to make to this dough bowl. One of the elements I am repeating in our home this Christmas is pheasant feathers. Wild pheasants have made a comeback in our county.

Our son-in-law, Jonathan, is a pheasant hunter, and he gives me tail feathers. So, I added a few pheasant tail feathers and a few smaller feathers as well to the arrangement. I made a spray of larger tail feathers in one corner of the dough bowl and a small spray of leathers in the diagonal corner.

In addition to the pheasant feather, I had recently bought six small golden figs. Bobby asked if they were gourds, then pears. They look a little like either at first glance.
I added a few sparkly acorns, but they were too much. A little bling goes a long way, especially with a woodland look.

Figs remind me of the holiday season, and the gold finish adds a bit of brightness to the centerpiece.
At first, I used this centerpiece on the sunroom coffee table. Until…

I added one more thing! Yes, dried oranges. I’m having so much fun drying oranges this year. There are a few secrets for drying almost perfect oranges. Make sure you visit The Best Way To Dry Oranges So They Stay Vibrant, where I share them all.
Then I moved my Christmas centerpiece to the dining room table and put a burlap table runner under it. I’m using this for my Thanksgiving dinner centerpiece and Christmas too. I wish I had made this sooner, so I could have used it for much of fall, as well.
I hope you will pull out your dough bowl or tray, basket, or bowl and create a unique Christmas centerpiece for your home. And maybe add a few tail feathers!

Click On The Video For More Christmas Ideas
Shop The Post
Find things to help make a Christmas Dough Bowl Centerpiece.

Now, please head over to my very dear friend, Suzy at Worthing Court to see the centerpiece on her dining room table. She has the Southern decorating sensibility and style I LOVE! You can be sure I am going to use her directions and copy her centerpiece!
My blogger friends have more beautiful Christmas centerpiece ideas for you today and tomorrow. I never stop being impressed with their talent! Make sure to visit them all.
Monday’s Tour
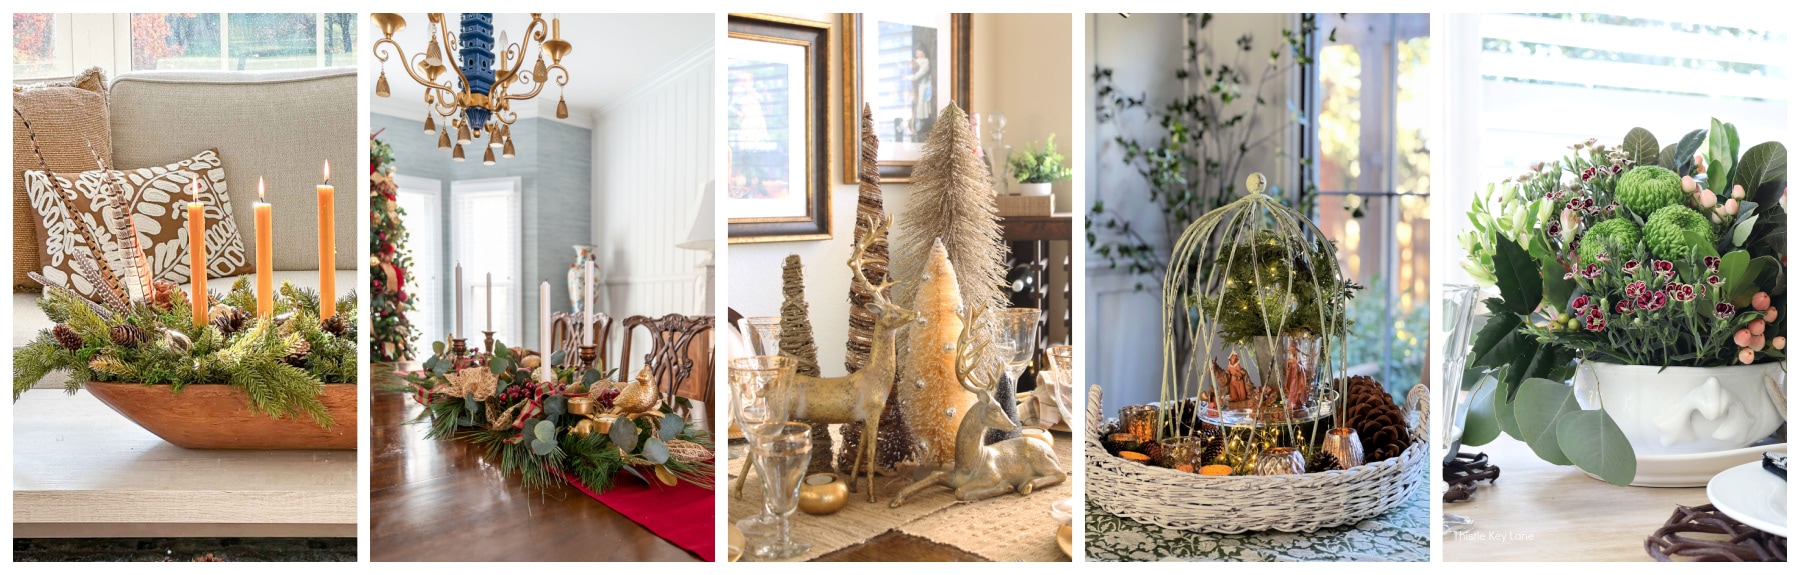
Stonegable // Worthing Court // A Stroll Thru Life // The Tattered Pew // Thistle Key Lane
Tuesday’s Tour

First Day of Home // My Wee Abode // Midwest Life and Style //
Bricks ‘n Blooms // Craftberry Bush

Merry Christmas,

Thank you for this. I’ve been looking for a new way to do my Advent candles and this is simple and lovely.
You are so welcome, Mary. Merry Christmas
This is the prettiest idea for a centerpiece! I’m absolutely giving this a try!
Yay! I bet your dough bowl arrangement will be stunning!
This is stunning. I love how you took such simple elements and turned them into something so beautiful. This would be pretty on any table for the Holidays. Now I need to dig out my dough bowl and see if I can get something going. Love the step by step tutorial, that always makes it so easy.
Marty, I am so glad you are part of our tour. Year after year, I am blessed to be included in yours. Happy Thanksgiving.
Thank you so much for this idea! I’ve never done an Advent wreath because I didn’t have a good place for a round one, but I’m definitely going to use your idea on my sideboard. I love the natural simplicity of the greens and the little spark that the gold figs add to the whole arrangement.
You are the best, Suzy! I know what you mean about finding places to put round centerpieces. I hope you will give decorating your dough bowl a try.
Such a lovely centerpiece Yvonne especially with your beautiful greenery. Every detail looks thoughtfully planned using pheasant feathers, the golden figs, orange slices and of course the colored candles. I always learn so much from your tutorials. Merry Christmas!
Happy Thanksgiving, Michelle. I loved your beautiful soup tureen centerpiece too.
Yvonne I love how your centerpiece turned out! It was fun to see your process and I agree, you can’t go wrong with a dough bowl! Absolutely beautiful and Merry Christmas!
So kind of you, Kelly. Happy Thanksgiving.
What a gorgeous dough bowl centerpiece, Yvonne! I love that you used taper candles. I’ll have to try that sometime with my dough bowl. The tip about the dry foam adhesive is helpful too! Hugs!
Thanks, Crissy! Your dough bowl is beautiful!
Love all your tips! Your centerpiece turned out amazing! So warm and cozy for the holidays!
Thanks, Stacy! Happy Thanksgiving.
Your centerpiece is so pretty, Yvonne. I love the rustic feel. It’s how I’m decorating for Christmas this year…and lucky me, I already have all the supplies on hand to re-create your centerpiece. Thank you for sharing. Pinned!
I love your centerpiece! The greenery and color of the candles are perfect:) Hugs-Tanya @twelveoeightblog
Aww, thank you Tanya!
Awesome as always, Yvonne! Those golden figs and orange slices, plus the feathers, just MADE your centerpiece. Your creativity and style never ceases to amaze me, my friend! Pinned!
Yvonne, thank you for this tutorial and everything you’ve shown us to make our homes beautiful and cozy! My Christmas decorations this year won’t be the usual shiny vintage red and green because it’s time for me to realize that my kids want to form their own traditions and celebrations, we’ve been opening gifts in my daughters home for many years now. I did not even put up a tree this year or last. I chose my theme this year as Christmas greenery and aromas (got the diffusers going this morning). I paired together tons of faux greenery, white ceramics and wooden elements. Since I’ve been following your blog, I’ve learned to guard my stock pile of pinecones, moss and quality faux greens and it never disappoints! I love creating different vignettes with all of these elements. Some of the greens appear multiple times during the year!
Sometimes when I look at your beautiful creations, I can smell the turkey roasting, the cranberry sauce bubbling and hear the clink of glasses and tableware! Happy Holidays!
I can almost see everything you wrote about. So Beautifully explicit, Carol. It’s so nice to hear you are enjoying StoneGable’s idea. Hugs!
Beautiful! Thank you for the step by step tutorial
I’m so glad you liked it!