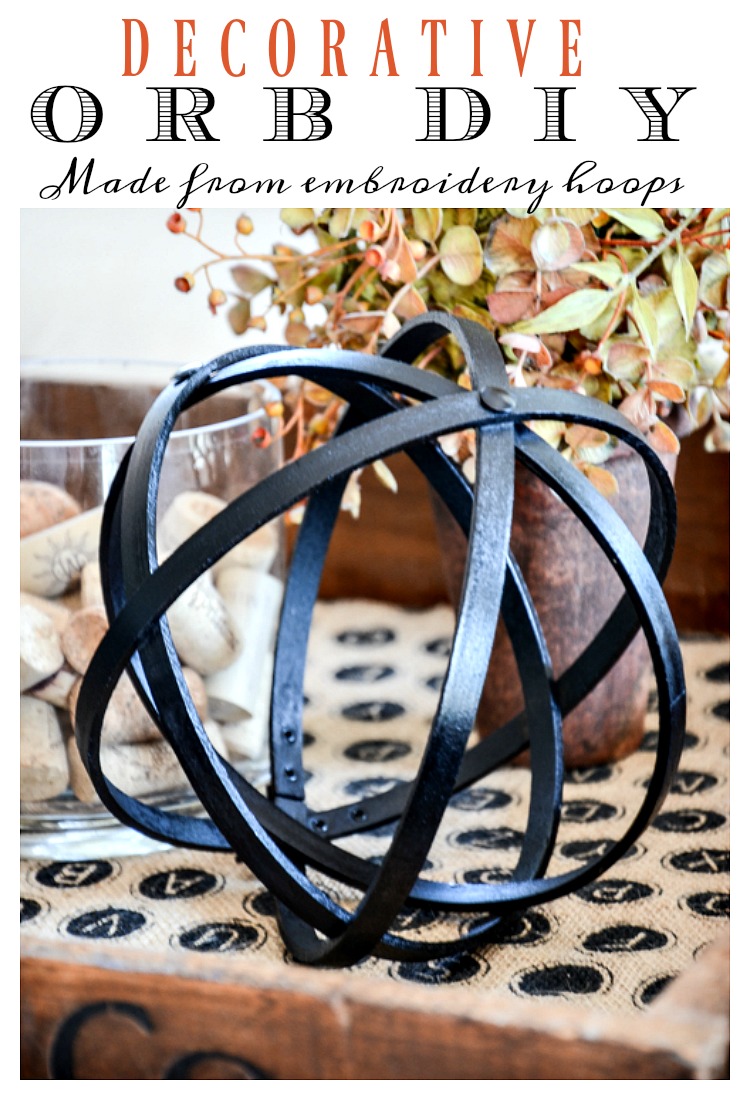
EASY TO MAKE DECORATIVE ORBS
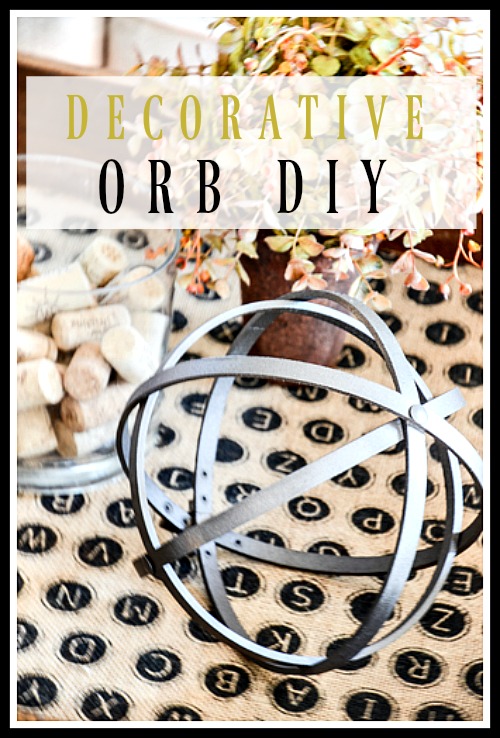
I have such a crush on decorative orbs! They add tons of texture, interest, and appeal to our homes! And they are so on trend right now! If you are like me, you love your home but are always on the lookout for fresh new ways to decorate it. I am comfortable with my classic furnishings but also want to add things that are popular right now! How about you? That’s where decorative ORBS come in… they are a great way to update our homes. But they can be quite expensive. So let’s make some ourselves. This is one of those DIY’s that is so stinkin’ easy and the end result is so so impressive. Come on, let’s get busy!
Today I’m joining my blogging besties for

Make sure to see what these talented bloggers are sharing at the end of this post.
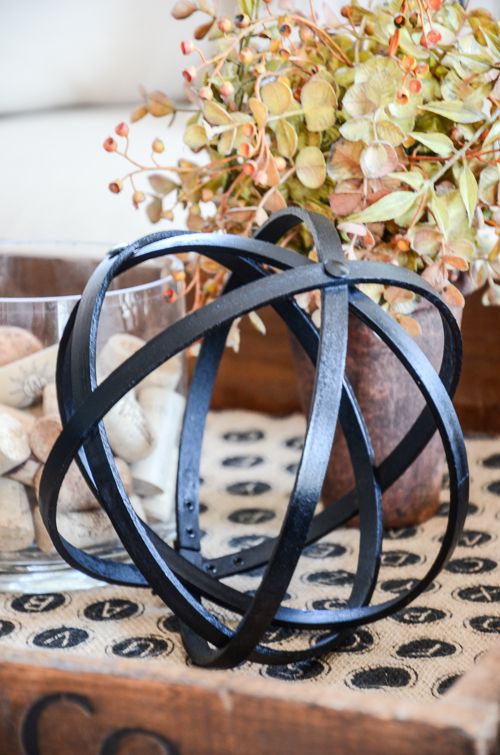
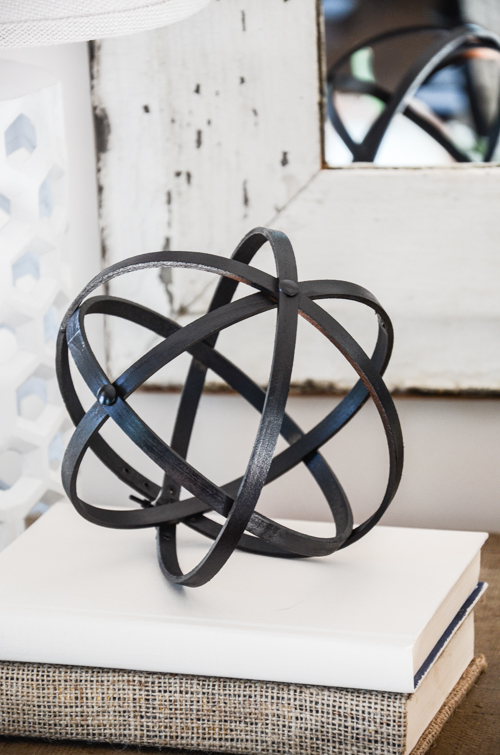
Aren’t these orbs so so pretty! And they can be spray painted to any color or metal. Today, I created iron and antique bronze decorative orbs for my living room. Ready to make some too? Here’s how…
Things you will need:
- 2 embroidery hoops the same size You can get them here:
- 3 thumbtacks any color
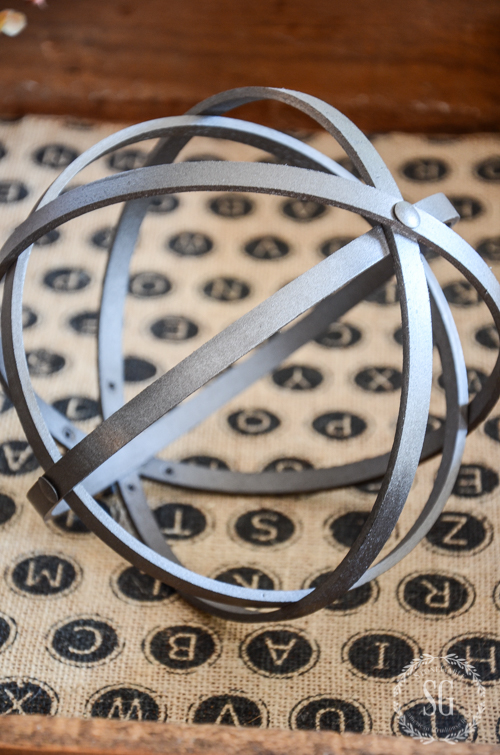
- spray paint I used satin black to look like iron and satin antique bronze.
Can you believe these pretty orbs are made from inexpensive embroidery hoops?
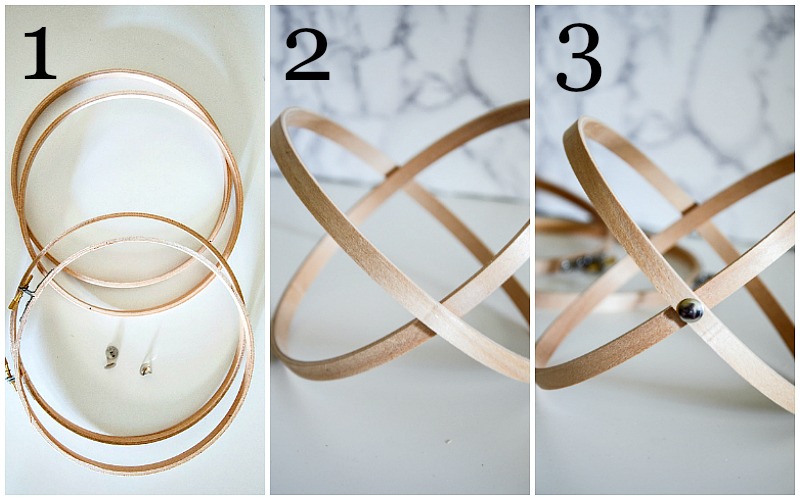
1. Here are the material. Pull the embroidery hoops apart. Put the inside hoops in one pile and the outside hoops with the tightening fixtures in another pile.
2. Work with the inside embroidery hoops first…. Put one hoop inside the other to make an “X”. See image above. This is not rocket science so don’t get stressed out about making them perfectly symmetrical. Close is good enough.
3. Push a thumbtack into the intersection of the inner hoops. Yes, they do push in but may need a little extra thumb pressure. See image above. Push the thumbtacks into both intersections.
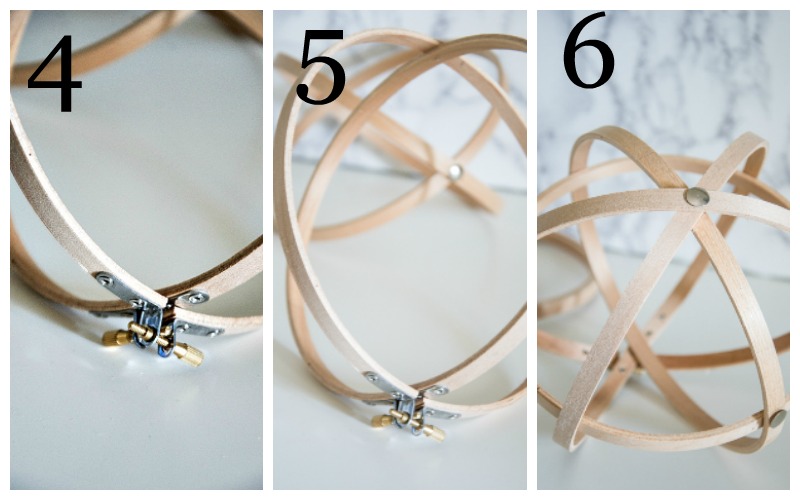
4. Now let’s work with the outside hoops. Loosen the tightening fixtures. Mine have a spring-type action.
5. Open them both up without them coming apart and put one hoop inside the other the same way you did with the inner hoops. Intersect the tightening fixture and tighten both. Make an “X” and thumbtack the one intersection like you did for the small hoops.
6. No for the fun part! Put the smaller hoops INSIDE of the larger hoops. You can do this any way you want. Just make sure everything looks sorta even.
Paint them with your favorite spray paint.
I just love these industrial accents! The next ones I’m making will have a hammered metal finish! So fun!!!! And I can’t wait to show you a light fixture I made from giant hoops! So easy!
When you make these how will you use them?
Now, head over to my blogging friends and see what great diy tips and tricks they have for you!
You might like to follow me on Pinterest and see what I’m finding to pin every day HERE.

Very clever! Makes for an interesting decorative piece! I will be on the lookout for hoops at the local thrift store!
Thanks for a great idea.
Brilliant and so doable!
Cool, going out to get some hoops today!
Love this!! I almost bought one at Target yesterday… Now I can make my own! Thanks for the tutorial!
I just love the weather came out. I thought about embridery hoops when these first became popular, but…this is why YOU are the fabulous blogger and I am not…Follow through!!
I will be doing this. I wish there were a way to make tiny ones, so far I have settled from grapevine, but f you think of a way to do mini orbs, show us!
What a great idea. Thanks for sharing. I just wanted to know if you leave the tightening mechanisms on and just spray paint them or do you somehow remove them?
Love how easy this one is. I’ve pinned it and added embroidery hoops to my thrift store shopping list. The link to Thistlewood Farms isn’t working. I even went to her site to search and couldn’t find it. I’ll try again later today.
Very clever indeed! Love the industrial look!
I am so excited about trying this DIY because I love orbs! Thank you for this idea.
What an economical option! Love it!
You’re clever
Love this, Yvonne – just to make sure I’m understanding this correctly, those tightening screws, etc. are still on the hoop, right? You just place the orb with them down at the bottom to make them less noticeable?
Yvonne, I never would have thought these are embroidery hoops…so creative! A great DIY! Pam @ Everyday Living
This is a NEET idea ! Easy to make too !
Always great ideas from “the master”, thank u dear one!
Genius! I have those hoops! I can do this. Thanks for the inspiration and dose of confidence.
This is on my “to do” list…can’t wait to try it!
Who knew? I may try this! I will have to get some hoops though, as the ones I have are currently in use! I love the hammered metal look.
Love these! I made your topiaries a couple years back and still get compliments on them. I can’t wait to try my hand at these!
I just had one of those “Why didn’t I think of that?” moments!
Thank you so much,
Wow, I am going to try this. I know I have some hoops in my stash of sewing stuff. I always look at orbs in the store and you are right, they are pricey! Thank you for this post.
I have used store bought orbs in my decorating for years but never tried this project. I especially love the metallic painted orbs! I think I’ll try those myself.
I see a multitude of ideas in my head for these lovelies! Hugs, Dorinda
So clever! I absolutely love them.
Love this idea.
Interesting. I have quite a few hoops in my craft bin, but didn’t have a plan for them yet.
This is cute and so doable! Right now we have a 70lb, 7mos old puppy who is getting into everything. He is learning quickly but our decor is limited for now because I wouldn’t want him to eat it! I will have to try this when he isn’t such a little (huge) “munchmouth”! Thanks for the inspiration! karen…
Cute! I think I could even manage this one. Lol!!
Your step-by-step instructions are wonderful. Love this idea. Hob Lob here I come. 🙂
What a great idea!
Looks great and sure saves a lot of money!
Genius, my beautiful friend! This is truly a fabulous idea, your orbs look amazing. With all the wonderful metallic spray paints these days, you can give the orbs any metal finish. I want to make some huge ones to add to my Provence front garden display for fall.
Just thinking about the many, many embroidery hoops I’ve left behind in many, many thrift shops!!!! Love this project….off I go to my fave TS!!!
Yvonne,how cute and resourceful. I love the little orb as a decorating element. I can not wait to try my hand at making my own orb. Thanks for including the instructions on how to make the orbs. Have a great day!
What a great idea!! I am pinning and can’t wait to make one!! I’ve seen them in home stores and they are so expensive, so I’ve always “just looked”. But now you’ve given this great tutorial – thanks for sharing! Blessings to you…..
Love your idea can’t wait to try it.
I too love the orbs! A couple of years ago I made some with the embroidery hoops with the intention of painting them but then decided to wrap jute twine around each of the hoops. This took a little of time (a couple of evenings in front of the T.V.) but I love the different texture. Now I think I will make some painted with the look of metal. Thanks for the tip of the thumb tack!
Wrapping the jute sounds like a great idea! I like these orbs but many times are a little pricey so am going to try this. Thanks! 🙂
You never cease to amaze us. My Fall diy list is growing. Again, thank you.
Your hoops look like the real metal orbs! Thanks for posting so I can make my own. Btw, I am not viewing your beautiful blog in my emails the way I used to. The site looks very basic…like it would when you are preparing it. Could it be a problem on my end?
I’m on the lookout for hoops. This is a great DIY – thank you. I think orbs make wonderful decor pieces.
Yvonne, I love this!!!! Amazing….thank you!!!
Absolutely love this! Its one of my faves. With your amazing talent I have so man now. You are a true inspiration! ?
So sweet Joann! I hope you make them. They are pretty and easy to make.
What a great idea, and so easy! Thanks for the step by step instructions!
I love these! Thanks for the idea!
How in the world did you figure this one out?! I’m make’n this today!
Genius! What a clever way to get the look without paying the pric!
Genius! What a clever way to get the look without paying the price!
I made a light fixture orb last month. So inexpensive!!
What a great idea! I am going to try this! Thanks!
Love this idea!!!! I can’t wait to make some!!
This is genius! I can’t wait to try. I made an orb out of the metal plates around wine barrels (I live in wine country!)
This gave me an idea how to improve my orb, and make one for inside. And, I’m sure it’s easier on the furniture.
Love this idea Yvonne!
This is seriously brilliant!
Love this! I just bought a bunch of embroidery hoops at the thrift store and was trying to decide what to make with them. I may have to make on of these!
Nice idea
This is my favorite kind of project…easy and boy does it pack a huge decor punch!
I thought these were metal! I was very curious as to how you were going to make them and figured I would see a blowtorch in the instructions. Embroidery hoops! How clever!
Look at you Miss Crafty!!! It’s gorgeous and so clever.
Love these! I will definitely make some. Thank you.
Brilliant,can hardly wait to try these Orbs.
Can’t wait to get started! Love it!!
I am unable to see the pictures as well! I want to see them!
I love this idea!!! Definitely going to try. I so enjoy your posts.
What a great idea!
Very cute, easy idea! I definitely don’t fall under the heading “crafty”, but these seem very simple to make!!!
I can’t wait to make this!!!
Oh my gosh! That is so clever! I can’t wait to make this! Thank you!!
Such a great idea! Only you could be so clever with something so simple but looks like you spent alot!
So cute, and looks so easy! I’m gonna check them out on Amazon right now!
Thanks for the diy tip!
I will definitely have to give this a try!
So very clever! I’m going to make this as soon as I finish painting my faux pumpkins.
Just Pinned. Can’t wait to make one!!
Thank You,
Patricia (NC Coast)
Can’t wait to try this! Thank you for sharing!
I love this! Very easy and so clever.
Ingenious! A craft even us not so crafty ones can create. Thank you!
Very Clever.
I think this is a terrific idea . Make a bunch and then hang from the ceiling with fishing line. Thanks for the inspiration .
Oh the fun colors these could be painted to go with seasonal decorating! A huge one for the front porch in a beautiful fall color…oh my!
I made a couple of these, one small and one large. I found with the larger one it looked better to add and additional ring (just one, though, so since they come in sets of two I did end up with an extra ring…an excuse to make another, I guess!)
You have such great ideas.
Great idea and looks easy to do!
I think that’s a neat idea, will have to try it. Orbs are so costly in the store> Thanks again!!
Such a brilliant and easy way to add interest to my sitting room! I will surely be making some soon!
Love the hammered metal look. I originally stained mine think I’m going to repaintbthem!
These orbs are great. Can’t wait to make one. I just bought one at Home Goods, but it will be a fun project for sure. You have the best ideas. I look forward to your blog each day. Happy Thursday ???
What a neat idea! I am looking forward to the light tutorial. Been looking to try something like that!
Awesome idea, really looks like metal! I love your blogs and I save everyone of y0ur emails!
Never would i have thought of embroidery hoops. Thanks and very clever.
What a fun way to make orbs. I think I could do it too. Thank you for this posting
Smiles
This looks like something I can do I will make some in burnt orange with some decorative berries for fa;;
what a great idea for all my old hoops AI have laying aroung
Thank you for your instructions on how to make a decorative orb. I, too, have fallen in love with them. I’m starting to think about Christmas gifts and might try to make these for my daughter and niece as a little extra side gift. I believe even a non crafty person such as myself might be able to pull these off ok.
Thank you for sharing how to do this. I am kicking myself for giving away many embroidery hoops to the thrift store!!! I can always get more, and this is a beautiful accent. Blessings
Very creative! Love it!
Very neat trick! I want to see the biggest ones made into a light fixture!!!
Oh my…thank you for sharing. I can’t wait to try this DIY!
You are so clever my friend!!
Love this idea…so cute and easy! I’ve got to make some of these.
Thanks for sharing:)
I made these in some smaller sizes, but now I’m ready to make larger ones in the hammered look. Such a fun look anywhere you put them.
Awesome! Great idea
I have quite a few of these from my mother’s crafts, I am going to make several for the girls in the family as a fun way to remember mom’s crafting. Thank you for the great idea. Always enjoy your ideas. Thank you for all you do, I look forward to seeing your ideas each day.
Great inspirational piece. Thanks.
Great idea.I’m definitely going to do this. Thanks for the inspiration.
Fun and easy! Can’t wait to buy hoops!
I have always wanted an orb. but your right they are pricey, can’t wait to try this ….I have a list of projects to do from this blog ….so excited.
Love the orb diy. You have great style.
What a great idea!!! I dug out some of my old embroidery hoops from many years ago!!! Nothing a little paint won’t fix!!
Yours looks awesome Yvonne!!!
What a great way to create inexpensive orbs. You are so creative. Looking forward to seeing your light fixture!
Very nice job! You have inspired me to make them as well! Thank you for sharing. Love your blond look forward to your emails.
Another great idea!! Thanks again!
This is very cool! I can’t wait to make some.
I am so impressed with how elegant they look–not DIY-ed at all!
Ingenious! Sometimes the simplest things make the biggest impact.
Will hang mine in front of my kitchen window for Halloween. Have a Anna Lee small witch on a broom that I will tuck in the center of it an easy simple window hanging over the kitchen sink.
Such a great idea!
I can’t believe how good these look! And I would’ve never guessed they were made with embroidery hoops! Love It!
I see a decorative orb in my future, today!
Great idea Yvonne! Can hardly wait to see how you did the light fixture.
Love these orbs – cannot wait to make a couple.
thank you for the tutorial on the cute orb~!
Love this project!! I am going to make a few for my mantel. I like the metallic look.
So easy and has such an impact! Great idea!
How creative! Love these. I might actually be able to do this. 🙂
So very cool Yvonne!!!…love it! Who would have thought!!!
I have looked at these and they are so expensive I had to pass them by but still took a 2nd and 3rd look. I think I can do this.
Thank you so much !!
These are a definite project for me! Couldn’t find the link to your source for the hoops?
And have extra embroidery hoops on hand. Lucky me!
great idea would love to find the info on making one into a hanging lamp!! I too will try the thrift shops first. I’m not on Facebook but hope to win your wonderful gift of Visa. Ann Lee S
These are just so cute , I love them. Thank you so much for the how too’s.
I will be pinning this also to make a little later as I have some fall projects from you that I want to get started ,now that I have graduated from school I can play.
Be Blessed
How clever, I would of never guessed what they were made of. Thanks for sharing.
Fantastic idea! I too have these and have to dig them out of the basement!
Cute and creative idea.
This looks so easy. Week end project planned!
Love this. I might even be able to accomplish this. They are so expensive otherwise. Thanks for the idea.
I have been wanting some “orbs”. I am DEFINITELY doing this! Thanks for the instructions.
My friend gave me some hoops to try to make some orbs. So now that I have your wonderful instructions I am ready to tackle this project. Thanks so much.
What a great idea! Thanks so much for sharing.
Oh Yvonne, this is a great crafting trick and I really thought they were iron! I’m looking forward to making a couple of these for the console table in my living room and for one of my Thanksgiving tablescapes. Thank you!
So cute, love how easy they look to make.
Thanks Yvonne. Great idea.
This is a great idea!
Love the pillows arrangements need to buy couple lime green pillows also neat idea for the embroidery hoops you are so talented
I love this! I have some old embroidery hoops somewhere and I going to fish them out and get going on it right now.
Awe you made this look so darned easy!! I’m going to try it. I think the hard part will be spray painting..I’m not that great at spray painting and I have very little patience waiting (especially for things to dry!!) Thank you!
How fun! Got to give these a try! Thanks!
I made a small one a couple of years ago for the dresser in my bedroom and I love it. I think I found the instructions on Pinterest. I wished I’d seen your instructions first because I had a rough time getting the hoops to stay together. My instructions did not call for the thumbtacks. I’m ready to try my hand at a larger one for our TV room using your instructions this time.
What a GREAT idea !
When I saw your orbs I thought, wow, and then I find out I can make them and with, “embroidery hoops”, I’m off to the store. As always, thank you teacher.
How clever! I never would have guessed by looking at the first photo the what the orb was made from. And to think, I recently gave all my embroidery hoops away :o(
Thanks for the great idea on how to make decorative orbits. I will be making some!
Wow love the orb and the idea from hoops God bless
What a cute and easy tutorial. I love orbs as well Big, small , metal or grass. Ineven saw one made from drinking straws! The orbs in my home are all gold but I love the black. Can’t wait to get to the craft store for supplies. Thanks,
Kim
My husband and I made an outdoor orb with the metal rings off of wine barrels. Turned out pretty cool.
I’m in love with these orbs! I have already ordered all my supplies & am excited to begin making them. I only hope mine end up looking as good as yours! I would like to give some for gifts. Keep posting your awesome ideas…& I LOVE the Sunday scriptures & bible study you present. Thank you so very much for that. God bless!
Where do I find the alphabet print burlap you use to cover books?