HOW TO DECORATE AN OUTDOOR CHRISTMAS PLANTER

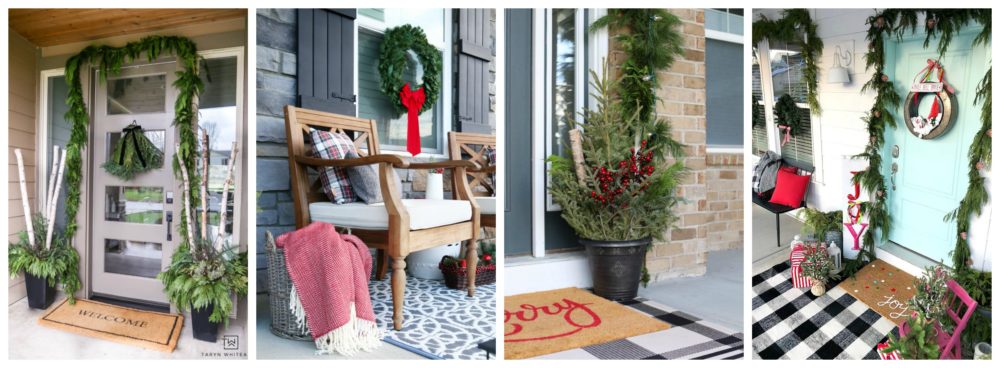
Hi Friends! Welcome to the Christmas Porch! This year the front porch of StoneGable is decked out with lots of real greens and pretty natural accents! Birch logs, flocked branches, Magnolia leaves and lots and lots of fresh evergreen branches! Join me on my Christmas Porch!
Today I’m joining a group of blogging friends for CHRISTMAS PORCH IDEAS!

Make sure to stop at the bottom of this post and visit all the fabulous blogs participating in the tour! A big THANK YOU to Taryn at Taryn Whiteaker for putting this Christmas tour together!

Before I share my porch and how to make a gorgeous planter I want to offer you two free CHRISTMAS GIFT CHECKLISTS! Be more organized this year!
This year I decided to take a more natural approach to outdoor decorating! So I’m letting the beauty of the season take center stage.
Before I show you how I made these full Christmas planters let’s take a look at the rest of my porch! And before that, I need to address the big grey elephant on my porch. Our porch floor lifted a tad on the right side because of all the torrential rains we have been having. It is a mahogany floating porch and will settle when it is dry. Sorry, it is a bit of a sore eye in these photos.

For me, Christmas decorating starts by hanging a wreath on my front door. This year, unlike others, I chose a natural evergreen wreath with sprigs of boxwood. I added the magnolia leaves and a bow as well as the white monogram.

Adding our monogram to a wreath is a signature of StoneGable. I found it HERE. I’ve used this cut out wooden monogram for years and years on many different wreaths! It is attached to the wreath with a thin elastic jewelry thread. You can see it HERE.
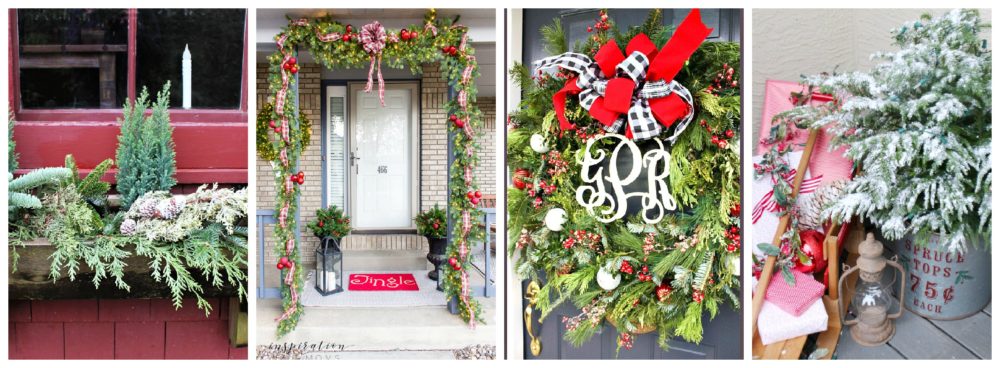
The star of our Christmas Porch are the two large containers filled with greens, birch logs, magnolia leaves, fragrant cedar, and a sprinkling of flocked branches.

Flanking the containers are tall white lanterns. The bottom of the lanterns are filled with fragrant cedar and a candle is perched on a well worn wooden candlestick. Like the candlesticks in the large hanging lanterns the candles are battery operated and are on timers to light up every evening. You can find the candles I use HERE. The lantern was from The Pottery Barn Outlet.
I made a circle of fragrant cedar to rest around the top of the lantern. I love the tiny pinecones! Nature’s attention to detail. Sigh!

I’m so excited to show you how to make these really easy Christmas planters! I want to thank the kind people at Gardener’s Supply for the pair of fabulous outdoor container planters. You can see them HERE. These self-watering planters are on sale now!
Let’s make a beautiful outdoor Christmas planter…

Materials:
This will make one pot with leftover Christmas tree greens
- planter (see mine HERE) with soil (HERE)
- garden pruners (see my pick HERE)
- scissors
- birch logs
- saw (if you need to cut the birch logs or dowel rods)
- 1/2″ wooden dowel, cut into 16-20″ pieces
- long clear zip ties (see them HERE)
- Christmas tree greens (I purchase a “B” grade Christmas tree from a local nursery. They are much cheaper)
- one 9 foot garland with assorted greens. Preferably pine and one other evergreen.
- large iron orb, optional (I found it locally- here’s where you can contact Cocalico Creek and ask about the orbs)
- add-ins I used sugar pinecones, magnolia leaves and flocked branches (find Sugar Pinecones HERE)

1 Fill the planter up with soil. The Tru Dot planters from Gardener’s Supply have a water reservoir in the bottom third of the pot so the entire pot does not need to be filled with dirt! I love these planters! They are beautiful, well made and ingeniously they are also self-watering!
Add any architectural piece to the planter if you have one. No need to, though!
2 Cut birch logs 18-20″ long. I used three logs per planter.
3 Now, let’s fasten a birch log to a dowl rod. Extend the dowel rod over the edge of the birch log about 10″. Tie a 1/2″ dowel to each birch log with two long clear zip ties as shown above. Cut off the ends of the zip ties.
4 Stick the dowel rods into the soil until the birch logs almost touch the soil. Make a triangle with the logs.

5 Cut apart the garland. Make sure to leave small bunches of pine and other evergreens tied together with the wire from the garland. This makes it easier to add to the soil.
6 Start adding pine greens around the inside edge of the planter, adding another variety of evergreen (I used fragrant cedar) here and there as well. Let the pine branches drip down over the side of the planter and pack them close together for a look lush.
7-8 Continue making an evergreen edge all the way around the planter. Make sure to stick the ends of the boughs deep into the soil so the hold in place.

9 Cut branches from the B-grade Christmas tree.
10 Stick the branches into the soil to fill in the planter. Make sure the branches are long enough to give the arrangement a nice rounded shape but not too long that the birch logs are lost within the greens. Add pine boughs from the garland and other pretty greens.
11 Add pinecones if desired and other add-ins.
12 Look your creation over fluffing it and adding greens where needed. You want it to look full, lush and spilling over your planter!
Finally, spray Wilt Pruf or any other antitranspirant liberally on all the greens. It will keep live greens looking their best all season long!

These attractive Christmas planters are so much easier than you would think. My best tip is to gather all your material together, have the planters filled with soil, prep the birch logs, cut the greens and have all the add-ins at hand. I put the greens in one large laundry basket and everything else in another so everything is ready!
When all the elements for the planter are prepped, this Christmas planter should take less than 30 minutes to assemble. Easy-Peasy!

Taryn Whiteaker Designs | Just A Girl And Her Blog | Two Twenty One | Tatertots and Jello
Jaime Costiglio | Inspiration For Moms | Stone Gable | Clean & Scentsible


Again, thank you Gardener’s Supply for sponsoring this post! All the opinions are totally mine.
This post contains affiliate links.
Beautiful and tasteful! I love it!
Just love the natural look. We live in the country and I am able to get all the greenery I need – free. Also decorate the gate we have at the end of our drive with greenery a bow, ribbons and pinecones.
I love using natures decorations, you can find the best stuff! How are you hangubg your wreath? I don’t see a wreath hanger…
Hi Audra, Bobby actually put a large hooked screw in the door because it is never without a wreath. But if you don’t want to be that extreme try 3M hangers for heavy outdoor use. They are fabulous! I have another door that does not have a hook and I use a 3M hangers on it.
Beautiful, you’ve inspired me!!
Yvonne , I love your planters on your front porch, especially the addition of the Magnolia leaves. Yvonne, I’m writing to you from Inden, Germany right now. My husband and I are visiting friends and are going to five Christmas Markets while here for the next two weeks. I’m getting all kinds of ideas for decorating. Tonight we are going to a castle in the Efeil to a Christmas Market. I can not wait to see all the sights and sounds of the season. Have a great day!
Have a beautifully fun time Theresa! Germany’s Christmas market is on my bucket list!
Just beautiful! Where did you get your initials if you don’t mind to share! Very elegant!
Hi Phoebe! There is a link to the Etsy shop in the post. Even though we are not southern I like to think I am and a monogram is a must for us southern belle wanna be’s!
Love it. Can I ask what color is the front door?
Hi Kim, I get asked this all the time. And there is a story behind the paint color. The short answer is… I wish I knew! The door color was a very happy accident! The paint color (gray) we chose at the paint store ended up this pretty grey/blue. And we love it!!!!! The front door will need to be repainted next spring so I’ll take a picture of the color back to the paint store and hopefully, they will try to match it.
Thank you for sharing your beautiful porch with us! I would like to order a monogram for myself (like your wreath) but I am wondering what size you have? Is it the 12” or 16”? Thanks in advance for your help. Blessings to you!
Measure the size of the hole in your wreath and choose accordingly. Mine is a 12″ monogram.
I love your planters filled with fresh greens. I was surprised you filled the planters with soil. I have done planters in years past and always used water soaked floral foam. Yours are beautiful and I look forward to trying mine with soil.
Hi Jan, the planter is quite large and it would probably take a huge amount of floral foam. Also, using Wilt Pruf really helps the greens from drying out. Give soil a try this year!
Oh Yvonne, your porch looks so stunning! You truly have a gift! And I love how the DIY planters turned out! So fun being “on tour” with you today!
~Abby =)
Abby, thank you! I admire you and your beautiful blog so much! Your home looks just lovely decked out in its Christmas finery! You even got it to snow!
The planters are pretty and inspiring. I love the use of fresh greenery. Using the orb for support is a great idea. Jean
I love your porch pots. I made one for my porch also. They are so fun and beautiful.
I love the simplicity of the porch decoration this year. It’s hard to outshine “mother nature.” May I ask, what size are your planters? Everything is just beautiful.
Hi Donna, they are 26 inch. Hope this helps.
So many great tips in this post! Thanks for sharing…
Hi Mary, I’m so pleased you are finding lots of ideas here!
I love this idea! It would be really cool to add fairy lights to each. It would look beautiful at night.
I was thinking of doing the same thing. I have lots of fairy lights
Super gorgeous, Yvonne, and an amazing tutorial, too! Your photos have a different quality lately… even more beautiful than ever! (I want to know what lens you are using!) Hugs!
Hi Julie, Same lenses but shooting something that is not white is so much easier!
Simply beautiful. The orb link took me to FB and I am not a member. May I ask the size? Thank you in advance
Straight out of a magazine, it’s so swoon worthy!! Thanks for sharing your planter tutorial, I’m always just mashing everything in and it never looks as beautiful as yours.
Thanks so much Jamie!
Your planters are amazing! I struggle with planters and I love the tutorial. So pretty!
xoxo
Hope this post cleared things up for you! Give a Christmas planter a try. It is really pretty easy!
Please give me details on monogram. What size to order for 22″ wreath? I bet we could pick out your home with out seeing this post. Just lovely!
This post is spectacular! So helpful and the end result is stunning!
I love your front porch! I do have a question though. How do you hang wreaths on your door? I do not see a wreath hanger. I have a security screen door and have had trouble with the magnetic hooks holding the wreath if the door slams at all. I have not found hangers for security doors and wonder if you have suggestions. If so, they will be greatly appreciated!
Hi Jean, Bobby screwed a hook into the door. I always have a wreath on it so it seemed to make sense to have a permanent hook on the door. Hope this helps.
Gorgeous front porch! I love those lanterns and the pretty wreath.
Thanks, Krista!
I’m in love with your porch!! Everything is so gorgeous! I love the idea of using the orb in the planter. Totally pinning this for next year.
Thanks Jenn!
What size of monogram is used with what size of wreath for your door? I would like to purchase the monogram and I use a 12 inch wreath on my porch.
and….. your porch is beautiful!!
It is very individual. You need to know the size of the hole in the wreath and go from there. I think a 12-16 inch monogram would probably work in most wreaths though.
This is gorgeous, Yvonne! Would you share where you found your wreath ribbon?
Hi Sharon I found the ribbon at a local shop.
Oh, you need to check out Laura from Garden Answer… I think you will like her look, too! She uses red instead of white, but overall, it’s the same gorgeous simplicity! I think she even has those containers at her place, although not on her porch. Soooo beautiful thank you for sharing with us!
As always, this is breathtaking gorgeous. Thank you!
Everything is so festive, natural, and just plain beautiful! You failed to mention the lovely way you decorated the window transom above your door with the Leyland Cypress branches.. What a fantastic idea! I’m going to try this on the windows above my garage door. May I ask how you hung them … I was wondering if I could use hot glue on the glass and if it would just scrape off with a razor after the holidays.
We screwed big white hooks into the frame of the transoms. They are there all year but because they are the same color of the transoms you really don’t notice it.
Love your blog! Planning early this year. What size monogram is inside your Christmas wreath. I need to find a two initial logo as we do not share a last name, and I’m struggling with that, any ideas?
I believe it is 14 inches. Look on Etsy. Most monograms are custom. I hope this helps.