NO-KNEAD 5 MINUTE A DAY BREAD RECIPE
A delicious, artisan bread using a master dough that makes 4 no-knead loaves of bread. Keep the dough in the refrigerator up to two weeks and pull off a chunk of dough when you are ready to make bread.
Servings 4 loaves of artisan bread
Ingredients
- 6 1/2 cups all purpose flour
- 1 packet or 1 TBS any kind of yeast
- 1 1/2 TBS kosher
- 3 cups plus 2 TBS cold or room temperature water
Instructions
MAKING THE DOUGH
- Combine flour, yeast, and salt into a 5-6 quart plastic container with a lid and stir using the handle of a spoon or a Danish dough whisk.
- Add the water and stir until all the flour is incorporated. This dough should be shaggy.
- Place the container of dough on the countertop with the lid off for two hours. Slight bubbles might start to appear. You can make bread with this dough but the flavor and crumb might not be fully developed. However, it will make a very acceptable loaf of bread.
SLOWLY BUILDING UP GLORIOUS GLUTEN STRANDS IN THE REFRIGERATOR
- Put the lid on the container and crack it. DO NOT put the lid on tight! Gasses will need to escape from the container.
- The next day you should see bubbles as the yeast is giving off gasses and the gluten strands are beginning to form. The dough is ready to make bread.
- This dough will make four 1 lb loaves of bread. Just lop off a chunk of dough the size of a grapefruit for the bread. The dough will last about two weeks in the refrigerator.
RESTING AND SHAPING THE DOUGH
- Put the dough taken from the master dough on a floured work surface. Form the dough into a ball by gently stretching the dough just a little and tucking the dough underneath itself with cupped hands. Give the dough a slight turn and continue gently and quickly tucking the dough under itself. Repeat until the dough forms a ball with a taut feel. Pinch the bottom of the dough together making a dough seam on the underside of the ball. This will create a boule (boul).
- Crumple and then flatten out a piece of parchment paper and put the dough in the middle of the parchment paper and loosly cover it with plastic wrap.
- Let the dough rest for 40 minutes or up to 2 hours. It will get just a bit larger depending on how hot or cold your kitchen is.
BAKING THE BREAD
- Preheat the oven to 450 degrees for 20 minutes before the boule goes in to bake. Put a dutch oven with the lid in the oven when it begins to preheat.
- When the 20 minutes is up, take the plastic wrap off of the boule and give it a good dusting with all purpose flour.
- Using a sharp knife, slash a half-inch deep cut into the top of the bread. Cut the boule almost end to end. This will give the steam a place to escape so the bread does not blow out at the sides.
- Pick up the parchment paper with the boule and gently place it in the dutch oven. Put on the lid and bake in the center of the oven for 25-30 minutes.
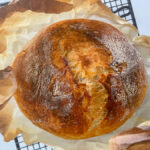
- Take the lid off of the dutch oven and you will see the bread has risen and is starting to brown.
- Put the dutch oven back into the oven without the lid and bake for an additional 15 or 20 minutes or until the bread is dark golden brown.
- Remove from the oven.
- Take the boule out of the dutch oven with a spatula, and put it on a wire rack to cool. Remove the parchment paper from the boule when it is cool enough to handle.
- Wait until the bread is at room temperature, slice, and enjoy!
TO MAKE ANOTHER BATCH OF MASTER DOUGH
- To make another batch of master dough you will need to hold back a baseball size piece of dough from your first batch. Add the small piece of dough and the flour, yeast, salt, and water as called for in the recipe to the container.
- Mix all the ingredients together until incorporated. Scrape down the sides of the container and mix the dried scrapings into the dough.
- Let the container set out on the counter for two hours and then stick it into the refrigerator.
- The master dough will last for two weeks.
- Continue this process over and over again to make delicious no-knead bread!