EASY PEASY BOOK PAGE FAUX BOOMS
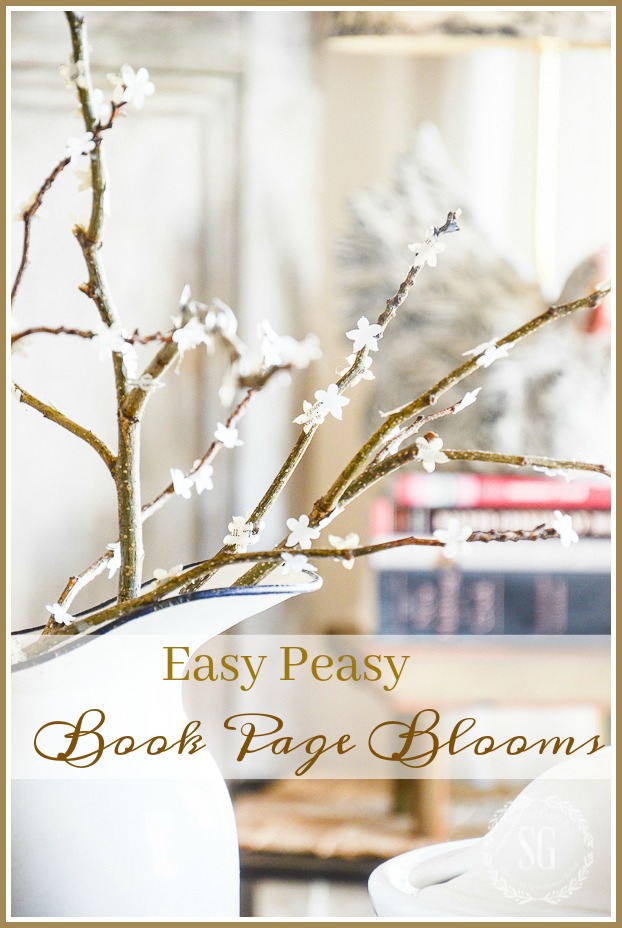
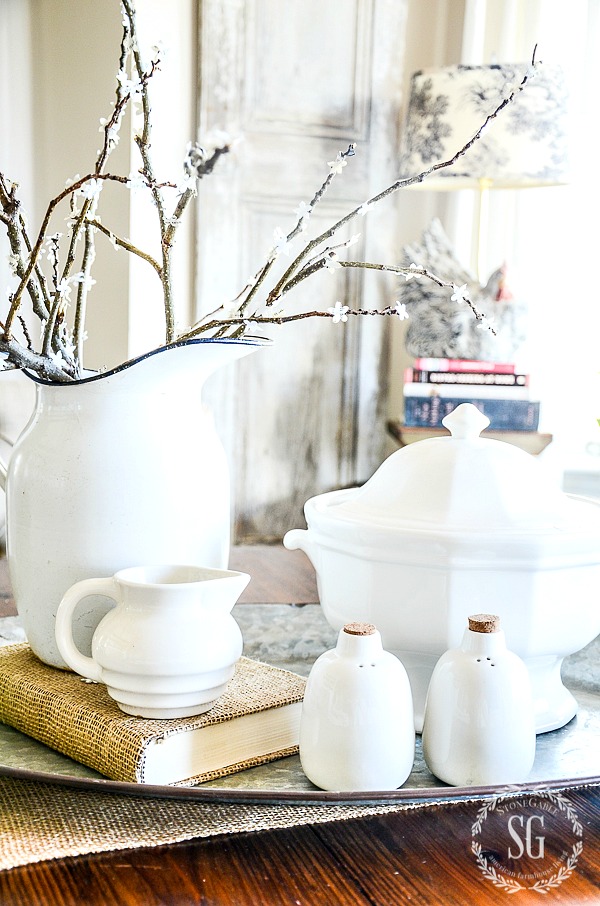
Don’t you love free decor? And don’t you love it even more if it looks just amazing? Well then, you will love today’s post! I was so sad when the forced branches I had been babying finally dropped their blooms and were done. They looked so so pretty and I wished I had more. All I had left was a bunch of great bare branches! They were too pretty to throw away. So I came up with an idea of making my own blooms for the branches. These blooms won’t drop or die either! So being a fan of book page creations I make my own book page faux blooms on twigs! Even if you are not crafty, you can do this!!!!

Did you listen to our current episode of Decorating Tips and Tricks? It’s all about finding HIDDEN STORAGE SPACES in your home!!! No matter what size our homes are we can always use more storage!
Listen below…
And listen HERE to all our 31 episodes and get the show notes!
Today is DIY TIPS AND TRICKS! You can see other great posts at the end of mine!

You won’t believe how easy this DIY is and how pretty your branches will look! I chose to use pages from old books to cut out my little blooms, but you could use tissue paper or craft paper or paper bags… You are only limited by your imagination!
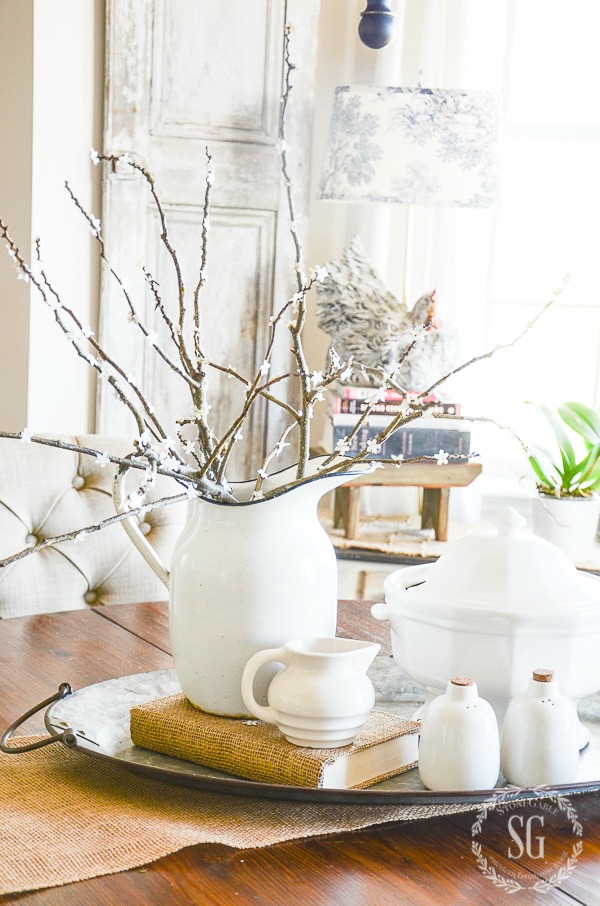
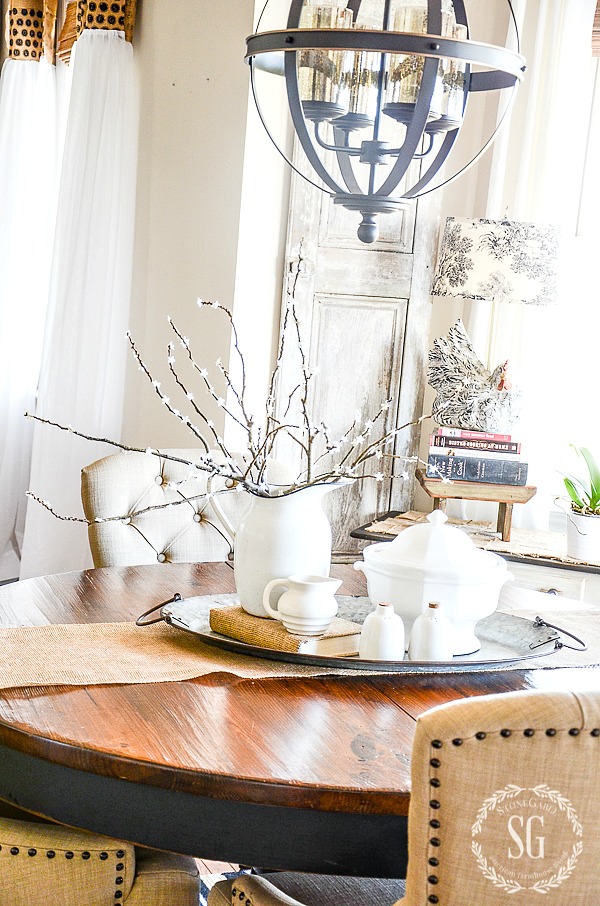
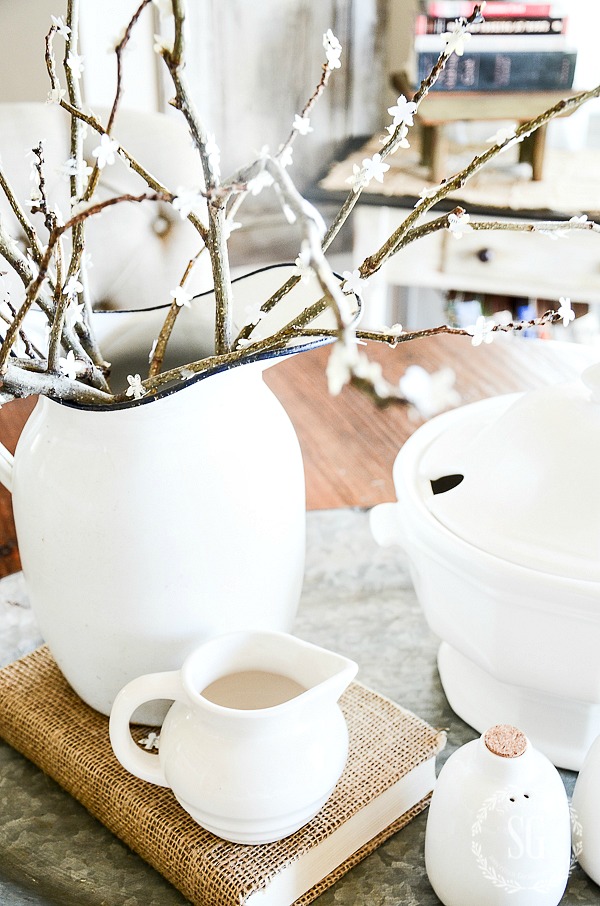
I transferred some of the branches to an old enamel pitcher and made a little vignette on my breakfast nook table.
The little flowers are so delicate looking!
Let’s make easy peasy Book Page Faux Blooms:
Materials…
- flower punch I got mine HERE.
- old pages from a book
- branches
- hot glue and hot glue gun
- hair blow dryer (optional)
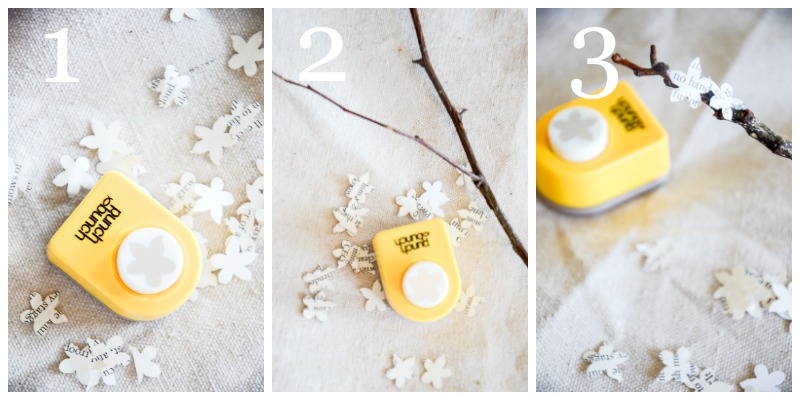
- Punch out the little flowers from old book pages
- Use thin-ish branches
- Hot glue the little blooms on the branch. Glue on all sides of branches. When flowers are glued and the glue is dried, blow them on the hot setting of a hair blow dryer to get rid od hot glue spiders.
Arrange and enjoy!
Make sure you check out my talent friends and what they are sharing below…


You might like to follow me on Pinterest and see all the great things I am finding to pin every day HERE.
This post may have affiliate links.
So simple and extremely cute! Love it!
What a cute idea that I never would have thought of. I will definitely have to make some cute book page flowers. Thanks for sharing a neat idea.
Love it! You are so creative. Thanks for sharing.
Such a cute idea!
Yvonne,
Just a heads up – you omitted the letter “l” in your headline.
You are sooo creative and yet all your projects become elegant additions to your design, even the cute things!! Amazing!!
I so loved this project! … such a beautiful project for young and old!!! Happy Easter to you and your family Yvonne!
I have the flower cutter, now all I need I see graceful branches. What a perfect idea! I thought I might try parchment paper; have you tried that?
Pretty cute, I would never thought to do that!
You are so creative! Such a cute and unpredictable idea!
Such a cute idea! And easy enough for me to actually do it! Thanks!
I am going to give this a go! Great idea!
Happy Easter Yvonne! Cute idea!
very cute thanks for the how to
I just bought a vintage book for $1.00 from the thrift store yesterday and started taking it apart last night! I intend to make an indoor wreath with it, and I may take this idea and add some paper punch flowers to it! How timely is this post!?! Thanks for always sharing your great ideas with us.
Blessed Easter! He is Risen!
He has risen, indeed!
Very creative…
Cute, Simple and inexpensive. What could be better? Wishing you a joyous Easter with your family! Peace.
Thank you for your inspiration. You are one talented girl.
Love this idea…in the spring, I’m up north, and plants, trees, etc. don’t bloom until May, so I’m excited to bring this simple idea to my front porch!!!! Thanks for all the super cute ideas you bring us!!!!!!
It’s fun to fake spring!!!!
This is genius!
How easy to do, and they look so real!
Love this idea! I may do some with yellow flowers to mimic forsythia.
Love the idea of using yellow paper to mimic Spring and add a pop of color!
Me too!
What a cute and clever idea! This is why I love getting your email everyday. You have the best ideas!
Thanks Carol! I’m thrilled you are enjoying the newsletter! Thanks for subscribing!
Oh Yvonne,
That is the cutest idea!!! I’m going to do that TODAY! So easy! Thank you so much for this easy peasy idea! Love it! Have a beautiful day!
A great idea, especially since I didn’t force any branches. I’d like to try this idea next year with Redbuds, I love their color and dainty flower. The vignette is beautiful, especially with the hen tucked away by the window. I collect ceramic roosters, even though I don’t have a country kitchen. Love the oval galvanized tray! I saw your swan on a previous post and it’s absolutely gorgeous!
Love this idea! I assume you used tweezers to place the paper – looks like a finger burner for sure!
Thanks for all your creative ideas, and happy Easter!
Great question! No tweezers Beth. I put the tiniest drop of glue on the branch and then laid the bloom on top of it. Hope this helps.
love that the blooms look real, but don’t die! 🙂
In your experience with projects which brand of glue gun do you prefer? Love getting ideas from your posts.
Any glue that sticks. Hot glue works best for this project.
What a cute idea and easy to do it. Thank you!
What a great idea! I especially like the idea of using tissue paper. Thank you Yvonne!
I can just imagine them crinkled up into different phases of bloom!
This is great! I have a vintage blue water jar that is too tall for many of the store-bought stems. With your inspiration, I can cut a branch to size and make my own. Thanks! Off to the back of the pasture I go.
Awesome!! What a wonderful idea! I must give it a try!
Love the branches and flowers, this would be a great idea for Christmas using stars, etc. I’m going to do this, thanks.
This is truly delightful….how much do you think this would cost at Pottery Barn?!?
Good point, Pamela! lol!
Love the easy peasy stuff! This is perfect for a light, fresh touch of spring!
Have a Blessed and Happy Easter
Looks easy – maybe I can do it too!
Love this idea, Yvonne, because for once I have everything. Won’t have to make a trip to Michael’s.
Wonderful diy and a project that 3 of our young grandchildren will get to do with (me) Nanny. Their family will share 3 days with us, so I may include your napkin eggs. I have several white (in my craft stash) wooden eggs that we will use, making it easier to handle, packing when time, “and” I’ve gotten rid of more stuff..Amen! Hugs for helping Yvonne.
What an adorable idea!!! I love it!
Another easy craft, very creative.
so cute who would have thought and they last for ever i like that
Love this idea!
Wow what a terrific idea! I’m definitely doing this!!
I love this idea.We have so many twigs from our weather here so now I have something to make with them
There you go!!!
What a clever idea and one to make Spring last.
So pretty!
Easy peasy AND free,gotta do me some of that!
These are so tiny, simple to make and pretty
What a cute idea! I love DIY projects that are easy to do. :o)
This is really an adorable vignette that you made using those branches. I really like the galvanized tray also.
Such a cute idea. This is something I will definitely do!
What an ingenious idea! I love that you share your excellent decorating tips with all of us. I get so much inspiration from reading your posts. Thank you!
How clever! Aren’t you the creative one?!?
You’ve inspired me! I have some “Red” colored branches that I purchased from IKEA, and had no idea what to do with them.
Because of your post, I think I will spray the branches more of a warm brown tone, and apply these adorable little delicate book page flowers.
Thank you for always being so inspirational! Enjoy your day!
I could just kick myself! A few months ago I did some trimming on a couple of crepe myrtle trees I have out front; why in the world didn’t I keep the limbs? I’d be willing to bet some of them had some branches on them small enough that could’ve been brought inside and used for projects such as this.
I listened to the storage podcast. Very good stuff! One thing you all covered lightly was the hidden storage under the sofa. Those that have sofas with high legs can fit beautiful coordinating storage boxes/baskets under their sofas, and it looks great! Many people have a low-standing sofa (short legs) and can’t store much under them. However, I found that under my low standing sofa (in my Wee Abode) I can store pieces of wood for craft projects! I had some wood standing on its end in my kitchen for quite a few months.. then realized I had this little hidden storage gem! 😉 No one can even see the wood in its little hiding place! Works like a charm when you have a tiny home with no garage!
Incredibly clever idea….so many bare branches have such great texture and shapes! So easy!!
I have been sick and I am behind on everything but i clicked on this today and I am so glad I did! I bet my granddaughters would love to make these! Instant Spring!
Yvonne,
When I ready to decorate I look at your posts and then go to my treasure trove and pull out all kinds of new vignettes inspired by your lovely pictures. I’m so glad to have found you!
Cindy, how sweet! I’m thrilld that I inspire you! xo
Such a cute idea, pinned it , love the little book flowers.
Luv the Easy-Peasy faux book flowers… flower punch ordered. Now to gather small branches…
this will be my weekend project AND then later in the week the punch arrives… I will be ready.
FUN project. –thank. you. Linda of No.Cal.
Beautiful!
Hello Yvonne.Thank you for the information on faux flowers and greens.You are sooo generous with your ideas.I really appreciate it. It will help save some cash, and they are beautiful.Blessings to you.Sharon
These little flowers are so sweet. Nobody does tabletops like you do!
I love the punch out flowers idea. I’ve got some twigs and branches ready to be decked out in beautiful blooms. Thanks